How to draw X-Section and L-section in AutoCAD by using SW DTM
"SW DTM" is a DTM (Digital Terrain Models / also called as Digital Elevation Models). It is free software. It has unlimited points capability. It has the feature of creating an X-section (cross-section) profile, L-section (Longitudinal Section) drawing, and contour creation. This software can also be used for creating 3D visualization. It is developed by SOFTWEL (P) Ltd.
Uses of SW DTM software
1. You can plot the survey points in layers by manually inputting and also using an Excel datasheet. SW DTM software creates a block for the individual points with point ID, code, and elevation.
2. You can generate a contour map at your required interval. The created contour from this software is efficient and accurate. Annotation of contour can be done for single or multiple contours.
3. You can draw grids in AutoCAD with specified intervals and text height.
4. You can generate a Longitudinal profile and cross-sectional profile by using SW DTM. There are also many things you can able to do by using this software like- feature line and boundary line creation.
You can download this SW DTM software by visiting this link-
Steps for creation X-SECTION or Cross Section by using SW DTM software.
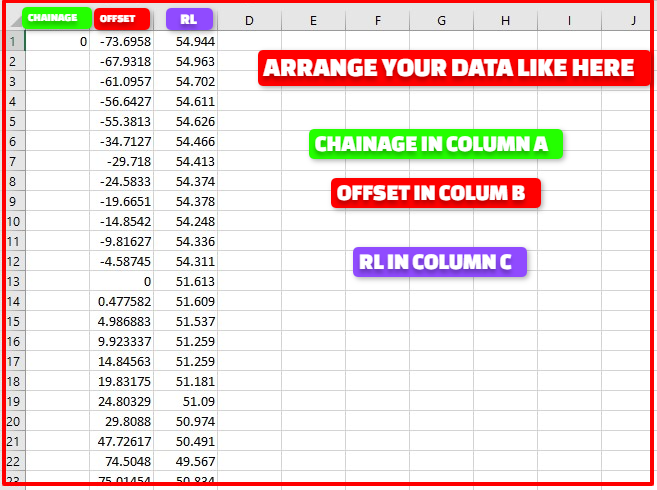
Step 1. Open Excel in your system. Arrange your survey data like in the below image. Write chainage in column A, Offset in Column B, RL in column C. Write only the values on this sheet only. Don't write the text on this sheet "Chainage", "Offset" and "RL" on the first row. Write only values only like the image shown below.
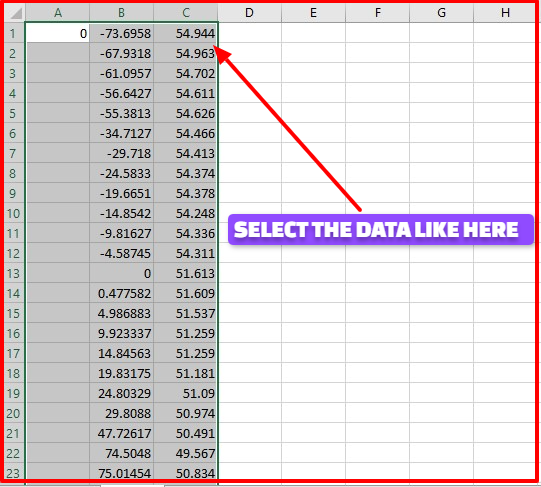
Step 2. Select the entered data like here. Just simply select the data by using the cursor. No need to copy and paste. The software will read the data automatically from the running Excel sheet. There is another method also. You can save the data as a file and open it from the "Drawing Cross Section" pop-up window. You have to select the option "From external File" option in the "Read File" option.
Step 3. First, open the AutoCAD software on your system. After that, open the "SW DTM" software. If you try to open the "SW DTM" without opening the AutoCAD before, then there you will show an error. So, open AutoCAD before opening the "SW DTM" software. After opening the "SW DTM" software, select the "X-Section" > "Draw L-Profile/ X-Section" > "Draw X-Section".
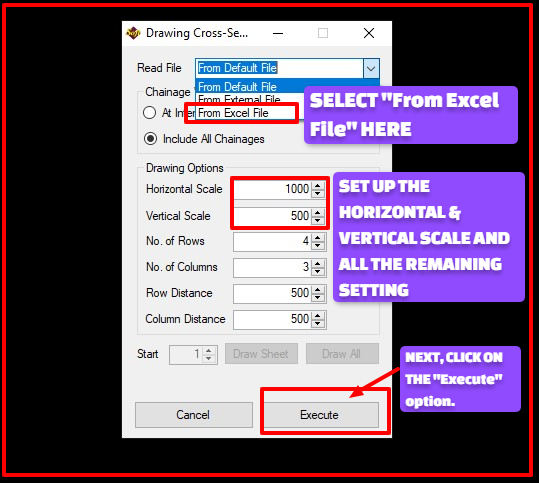
Step 4. A pop-up window like the image below will be open. Choose the "From Excel File" option in the "Read File" option. You can also choose the "From Default File" or "From External File" option also. But, Here, I am going to show you using the "From Excel File" option. After that, set the "Drawing Options"- Horizontal Scale, Vertical Scale, No of Rows, No of Columns, Row Distance, and Column Distance. After setting all of these, click on the "Execute" option.
Step 5. After clicking on the "Execute" option, you need to click anywhere on the AutoCAD to draw the sections drawing there. So, click on the required place where you want to draw your section drawing.
Step 6. Now all the x-sections will be drawn in the AutoCAD. The sections will be drawn in the location where you clicked on the AutoCAD. Check if all the x-sections are drawn or not. If all the sections are not drawn, then check the excel file.
The x-section or cross-section will be created like the below image. The cross-section drawing will show the scale on both sides of the cross-section. It adds a special look to the cross-section drawing.


0 Comments
Please do not enter any spam link in the comment box